
A freshly installed Linux VPS hits the public internet the moment it boots. We once watched a brand-new Ubuntu 22.04 box: within four hours of going live, /var/log/auth.log had logged more than a thousand SSH brute-force attempts from all over the world. Cloud security groups block some of that noise, but the host firewall is the second gate you actually control.
On Ubuntu and Debian servers, UFW (Uncomplicated Firewall) is the default answer: simple syntax, seamless iptables integration, and solid documentation. This guide skips the dozens of chained iptables rules and instead lays out the UFW workflow we have validated in production—a checklist from install and SSH access through web ports, Docker coexistence, cloud security group alignment, and the part that matters most: how to configure a firewall without locking yourself out.
Prerequisites: you can log in via SSH or the cloud console VNC, and you have sudo. If SSH is already failing, start with our Linux server SSH connection refused troubleshooting guide to tell network issues from firewall issues, then come back here.
Why every cloud server needs a firewall
Many operators assume that buying cloud infrastructure with a security group means the OS layer is optional. In practice the two layers do different jobs: the cloud security group filters traffic outside the virtual NIC and is managed in the console; UFW filters at the OS netfilter layer and is managed from the command line. Running only one layer is like locking the front door but leaving bedroom doors open—lateral movement on the network, accidentally exposed services, and post-compromise reverse shells all need host-level rules as a backstop.
Under the hood, UFW is still the iptables front end described in the official Ubuntu UFW documentation: when you run ufw allow 22, it translates into the matching ACCEPT rules. The syntax reads almost like plain English, ufw status numbered gives you a clear view of current policy, and editing rules is far less error-prone than hand-writing iptables chains.
| Layer | Tool | Management | Typical use |
|---|---|---|---|
| Cloud provider (outer) | Security group / Network ACL | Web console | Coarse inbound: 22/80/443 only |
| Operating system (inner) | UFW / firewalld | SSH CLI | Fine-grained: by IP, port, rate limit |
| Application | fail2ban / CrowdSec | Config files | Dynamic blocks for brute-force sources |
Step 1: Install and inspect UFW
Ubuntu desktop and most server images ship with UFW preinstalled, but minimal images may not. Confirm first:
sudo apt update
                sudo apt install ufw -y

                # Check current status (inactive means not yet enabled)
                sudo ufw status verbose

                # Enable on boot (configure rules before enable)
                sudo systemctl enable ufw
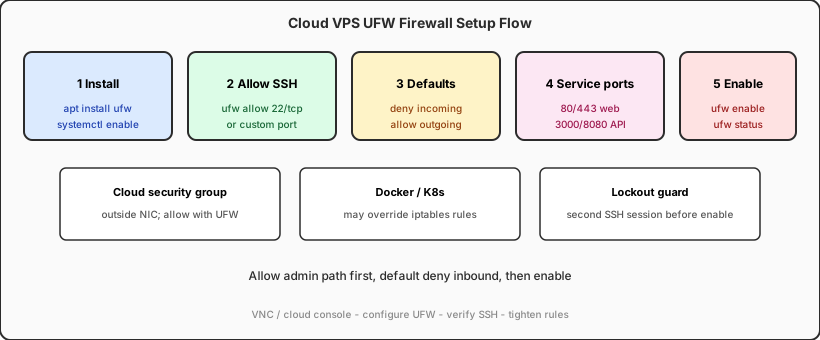
If you see Status: inactive, you can add rules safely one by one without them taking effect yet—that is the best configuration window. Do not run ufw enable before SSH is allowed, or you will lose remote access immediately.
Step 2: Allow SSH (the most important rule)
SSH is your management channel and must be allowed first. If you moved sshd to a non-standard port (for example 2222), the rule port must match sshd_config, and the cloud security group must be updated to match.
# Default port 22
                sudo ufw allow 22/tcp comment 'SSH'

                # Custom port
                sudo ufw allow 2222/tcp comment 'SSH custom'

                # Office egress IP only (recommended for production)
                sudo ufw allow from 203.0.113.50 to any port 22 proto tcp

                # By service name (when defined in /etc/services)
                sudo ufw allow OpenSSH
Verify sshd is actually listening: sudo ss -tlnp | grep ssh. If you see 0.0.0.0:22 or [::]:22, the service is fine. If ListenAddress is set to 127.0.0.1, UFW cannot help—that is an sshd configuration issue, not a firewall issue.
For how SSH ports and security groups fit together, see our Linux cloud host minimal exposure firewall decision FAQ, which includes an SSH/HTTPS trade-off matrix for long-term planning.
Step 3: Set default policy
The recommended UFW baseline is deny all incoming, allow all outgoing. Outbound stays open so the server can pull apt packages, call APIs, and resolve DNS; inbound is tightened so only ports you explicitly need are reachable.
sudo ufw default deny incoming
                sudo ufw default allow outgoing

                # List rules with numbers (for easy deletion)
                sudo ufw status numbered
Some environments tighten outbound too (compliance requirements): you can run ufw default deny outgoing and then allow out DNS (53), HTTPS (443), and so on. For most web and API servers, allow-all outbound plus selective inbound is the best cost-to-benefit ratio.
Step 4: Open service ports
Add rules for what you actually run. Common patterns:
# HTTP / HTTPS (Nginx, Caddy, Apache)
                sudo ufw allow 80/tcp
                sudo ufw allow 443/tcp

                # Or use the bundled service profile
                sudo ufw allow 'Nginx Full'

                # Temporarily open Node / other ports in dev
                sudo ufw allow 3000/tcp comment 'dev API'

                # Restrict admin panel to a source subnet
                sudo ufw allow from 198.51.100.0/24 to any port 8080 proto tcp
Production recommendation: if traffic can go through 443 behind a reverse proxy, do not expose 3000/8080 directly. Open only 22 + 80 + 443 in UFW, bind the app to 127.0.0.1, and terminate TLS with Nginx or Caddy—the attack surface shrinks immediately.
Step 5: Enable and verify
Once rules are in place, enable UFW:
sudo ufw enable
                # Prompt warns SSH may be interrupted; type y to confirm

                sudo ufw status verbose
                sudo ufw status numbered
From another machine, test: nc -zv your.server.ip 22 should report open; ports you did not allow (for example 3306) should time out or be refused. If SSH drops, use the cloud console VNC immediately and run sudo ufw disable to roll back, find the missing rule, and start over.
Advanced: rate limits, deletion, and rule order
UFW supports more than plain allow. High-frequency patterns:
# Rate limit: mitigate SSH brute force (6 attempts / 30s)
                sudo ufw limit 22/tcp

                # Delete rule by number (check status numbered first)
                sudo ufw delete 3

                # Block a specific IP
                sudo ufw deny from 192.0.2.100

                # Reset all rules (use with care)
                sudo ufw reset
ufw limit uses iptables recent under the hood to cap connection rates—effective for SSH, but not a substitute for key-based login and disabling password authentication. Rules match in the order they were added; more specific rules should come first. If an allow rule seems ignored, check whether a later deny overrides it.
Coexisting with Docker / Kubernetes
This is where UFW most often looks configured but does nothing. Docker by default inserts its own iptables chains and can bypass UFW rules, so you think 3306 is closed while the container port is still visible on the public internet.
Mitigations, in order of preference:
- Bind containers to 127.0.0.1 only—
-p 127.0.0.1:3000:3000, with the host reverse proxy facing the world - Omit
portsin docker-compose and use internal networks plus a reverse proxy - Set Docker
"iptables": false(you maintain forwarding rules yourself—advanced users) - Use the cloud security group as final backstop—even if Docker bypasses UFW, the outer layer still filters
Kubernetes nodes add another layer: Calico/Cilium NetworkPolicy usually owns pod traffic, with UFW as a node-level supplement. For a single VPS running Docker Compose, binding to loopback is usually enough.
How cloud security groups and UFW work together
Configure both layers, and keep policy aligned: if the security group allows 22, UFW must allow 22 too; if the security group blocks 3306, UFW allow alone will not let the public internet in—but a compromised peer on the network might still reach it, so UFW should deny by default.
Suggested division of labor:
- Security group: coarse grain—22/80/443 only; tighten source to office IPs or CDN ranges where possible
- UFW: fine grain—service comments, SSH rate limits, block malicious IPs
- fail2ban: dynamic layer—read logs and auto-ban
After changing either layer, verify from outside: nmap -p 22,80,443,3306 your.server.ip (scan only your own hosts). If 3306 shows open and you never meant to expose a database, check Docker bindings and application listen addresses immediately.
Troubleshooting: service unreachable after UFW is enabled
Work through this list in order—most issues surface within ten minutes:
sudo ufw status verbose—are rules actually active? Correct port and protocol (tcp/udp)?sudo ss -tlnp—is the app listening on0.0.0.0rather than127.0.0.1?- Are cloud security group inbound rules in sync?
- Is Docker bypassing UFW?
- Temporarily run
sudo ufw disablefor an A/B test (re-enable when done)
If only one source IP cannot connect, look for deny from rules or a fail2ban ban. UFW logging is sparse by default; when you need detail, set LOGLEVEL=medium in /etc/ufw/ufw.conf, run sudo ufw reload, then inspect /var/log/ufw.log for dropped packets.
Go-live checklist (copy and run)
On a new machine or after a reinstall, run through this sequence:
sudo apt install ufw -y
                sudo ufw default deny incoming
                sudo ufw default allow outgoing
                sudo ufw allow 22/tcp comment 'SSH'      # or your custom port
                sudo ufw allow 80/tcp
                sudo ufw allow 443/tcp
                sudo ufw limit 22/tcp                    # optional: SSH rate limit
                sudo ufw enable
                sudo ufw status verbose
Do not skip host hardening: SSH key login, disable root password login, and keep unattended-upgrades current. A firewall is the perimeter, not a cure-all—but it stops most automated scans cold and buys time for deeper security work.
A stable ops node: less anxiety around firewall changes
Managing multiple Linux VPS instances, many teams keep a fixed-egress-IP bastion for SSH jump access—security groups and UFW allow only the bastion IP, and local machines chain in with keys. A Mac mini fits this role well: native Unix on macOS, Terminal and OpenSSH ready out of the box; M4 silicon idles around 4W, quiet enough to run 7×24 on a desk as a relay node—more power-efficient and silent than another x86 mini PC.
A Windows box at the same price point draws more power and fan noise when left on as a jump host; macOS rarely crashes, and with FileVault and Gatekeeper, private key storage feels safer. If you also run Xcode or Docker for releases on the Mac, a cloud Mac mini can combine bastion and build duties in one node and cut context switching.
If you are planning a dependable remote ops setup, VPSSPark cloud Mac mini M4 is a practical low-power bastion and dev node— see plans and pricing so server hardening does not have to be a solo late-night exercise.