
In 2026, AI Coding is no longer insider jargon—it is a skill ordinary people can pick up: you describe what you want in plain language, and AI writes code, fixes bugs, and explains errors. Most beginners stall on the same question: the concepts make sense, but where do you actually start to ship a working AI app?
This guide is written for absolute beginners who want a result today. We clarify what AI Coding is, how it differs from chatting in ChatGPT, and walk you through building a simple web Q&A app you can open in a browser. No CS degree required—just one to two hours of following steps.
What is AI Coding?
In short: you explain the requirement in natural language; an AI coding assistant generates, edits, and explains code. Common tools include Cursor, GitHub Copilot, Claude Code, and Windsurf. They live inside your editor, read project files, complete code in context, and can scaffold entire files from a single prompt.
That is different from “opening ChatGPT in a tab and asking one question”:
| ChatGPT web chat | AI Coding (in the editor) | |
|---|---|---|
| Output | Text or a code block you copy manually | Changes written into project files; one-click diffs |
| Context | Mostly what you paste in | Whole folders, terminal errors, dependency configs |
| Best for | Concepts, copy, one-off scripts | Multi-file projects, iterative fixes, full apps |
If your goal is a clickable AI app, not a few chat messages, AI Coding tools are the smoother on-ramp. You do not need to master syntax on day one—but you do need three habits: describe requirements clearly, run the project, and paste errors back to the AI.
Before you start: what you need
The bar is lower than most people think, but a few things are non‑negotiable:
- A computer with internet (Windows, macOS, or Linux; examples here assume macOS/Windows + a browser).
- An AI coding tool account—Cursor free tier or trial is the friendliest starting point in 2026.
- A model API key—e.g. the OpenAI API or a compatible gateway so your app can actually “call the brain.” Some tools include limited built-in quota, but shareable apps usually need your own API.
- Basic computer literacy: install software, open a terminal (or Cursor’s built-in terminal), copy and paste. You do not need Python or JavaScript first.
Step 1: Pick your tools (2026 newcomer edition)
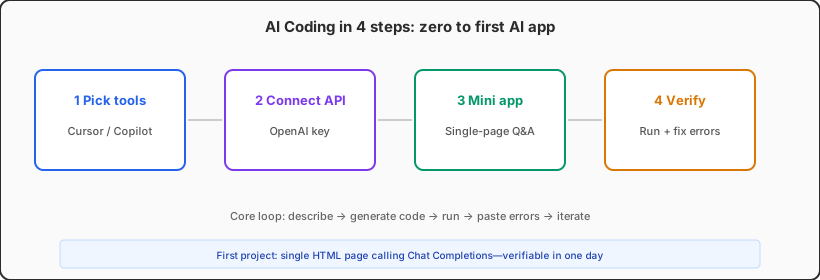
Do not hoard tools on day one—one editor + one model API is enough:
| Tool | Who it fits | Notes |
|---|---|---|
| Cursor | Zero background, want a project fast | Chat-driven edits, Composer multi-file generation; docs at cursor.com/docs |
| VS Code + Copilot | Already live in VS Code | Strong completion; whole-project generation less smooth than Cursor |
| Claude Code / terminal agents | Comfortable in the CLI | Great when you already have a repo and want batch edits |
Model API pick: OpenAI’s GPT line has the most docs and samples; Claude and Gemini work via many gateways too. For your first app, start from OpenAI’s Chat Completions examples to avoid “wrong endpoint” frustration.
Step 2: Define your “first AI app”
Do not build “the next ChatGPT.” Project one must be small, verifiable, and shippable in a day. We recommend:
Mini project: single-page AI Q&A—one HTML page, one input, a button that calls the GPT API and shows the answer on screen.
Tiny as it is, it covers the core chain: user input → API request → model inference → display result. Support bots, doc Q&A, and writing assistants are all variants of this loop.
After it works, optional upgrades:
- Add a system prompt to lock the AI role (translator only, Python tutor only, etc.).
- Store the API key in environment variables—not hard-coded in files you push to GitHub.
- Add a thin Node or Python backend before public launch so the key never ships to browsers.
Step 3: Build it step by step with AI
Copy this workflow. In Cursor, create a folder my-first-ai-app, open it, and send the full prompt below:
Build the simplest AI Q&A web page:
                1. Single HTML page + a little JavaScript, no framework.
                2. User types a question, clicks a button, call OpenAI Chat Completions (gpt-4o-mini or current lightweight model).
                3. Read API key from OPENAI_API_KEY env var; explain how to set .env for local testing.
                4. Show loading and error states; keep styling minimal.
                5. Generate all files and tell me exactly how to start a local server (npx serve or python -m http.server).
Then follow the AI’s runbook—usually:
- Create an API key in OpenAI, put it in
.env(never commit .env to a public repo). cdinto the project, install deps if any, start a static server.- Open
http://localhost:..., ask a question, confirm you get an answer.
Errors are normal—and the fastest teacher. Paste the full terminal trace, browser console errors, and relevant files back to the AI with “fix based on this error.” Three or four rounds is typical; do not take it personally.
Step 4: After it runs—four pieces (no memorization)
Spend ten minutes having the AI explain these in plain English:
- Front end: collects input and shows output—the UI you see.
- HTTP request: sends the question to whoever may legally hold the API key; local direct calls are for practice only—production needs a backend proxy.
- API key & billing: the key is a secret; you pay per token. Track spend in OpenAI’s Usage dashboard.
- Prompt: instructions to the model; clear role, format, and length stabilize output.
Ask the AI to sketch “what happens when the user clicks the button”—same mindset as later reading our agent and multi-agent pipeline article: one working path first, then stack capabilities.
Six traps beginners hit hardest
- Project too big on day one—login, payments, and a knowledge base before “hello world.” Start with single-page Q&A.
- API key in code pushed to GitHub—bots scan public repos; bills explode. Use env vars +
.gitignore. - Calling OpenAI directly from the browser in production—fine locally; public sites must proxy through a backend or every visitor sees your key.
- Ignoring usage—loops and long context add up; set limits and alerts.
- Vague prompts—“make it better” loses to “three bullets, max 40 words each, for college students.”
- Re-asking instead of pasting errors—a full error log beats re-describing the feature ten times over.
After your first app—where next?
Once a local question returns an AI answer, you have crossed 0 → 1. Pick a lane:
- RAG: upload PDFs/notes so answers cite only your material.
- Backend: FastAPI or Express for auth, deployment, and hiding keys.
- Agents: weather, databases, multi-step tasks—then deepen with agent practice posts.
- Deploy: static front ends on Vercel/Netlify; anything with secrets belongs on serverless or a VPS. For Docker packaging, see our Docker + AI deployment guide on the blog.
The 2026 AI Coding stack is mature: the hard part is not syntax—it is slicing requirements small, closing the loop, and trusting the AI with stack traces. If you only do one thing today—register an API, install Cursor, run single-page Q&A—you are already ahead of most tutorial collectors.
Bottom line: AI Coding does not replace your thinking; it lowers friction around typing code. Your first AI app does not need to be pretty or commercial—it needs to run. Once it does, you are a participant, not a spectator.
Practice AI Coding on a cloud Mac—with less setup pain
Windows is fine for many AI apps, but if you will also do iOS builds, Xcode, or want AI Coding and Apple development on one macOS stack, Apple Silicon’s unified memory and native Unix beat wrestling with WSL. An M4 Mac mini sips power for long editor sessions; Gatekeeper and sandboxing also beat scattering API keys across random PCs.
When your first app grows a real backend, VPSSpark cloud Mac mini M4 is a stable build and dev base— see plans so local setup never blocks your learning loop.